Top 10 WordPress Plugins you should use in 2020

Best Software Development Company in Banswara
July 3, 2019
Artificial Intelligence (AI)
August 13, 2019
1.Wordfence Security plugin

WordPress is by far the most popular Content Management System (CMS) in the world, but it’s not 100% safe.
Wordfence is the most comprehensive WordPress security solution.
Wordfence includes an End point Firewall and malware scanner that were build from the ground up to protect wordpress.
You will need a WordPress security plugin for advanced stuff like scanning for malware, blocking suspicious activity, or monitoring your website. Having said that, let’s take a look at how WordFence Security protects your website against common threats.
Wordfence is a free Plugin and it also come with upgraded paid options.Having said that, let’s take a look at how WordFence Security protects your website against common threats.
WordFence Security comes with a powerful scanning tool. Simply visit WordFence » Scan to initiate a scan. WordFence will check your WordPress site for common threats like backdoors, malicious and suspicious code, MySQL injection, etc. After the completion of the scan it will show you the number of issues it found. With
each issue you will see detailed information about it with practical advice on how to fix it.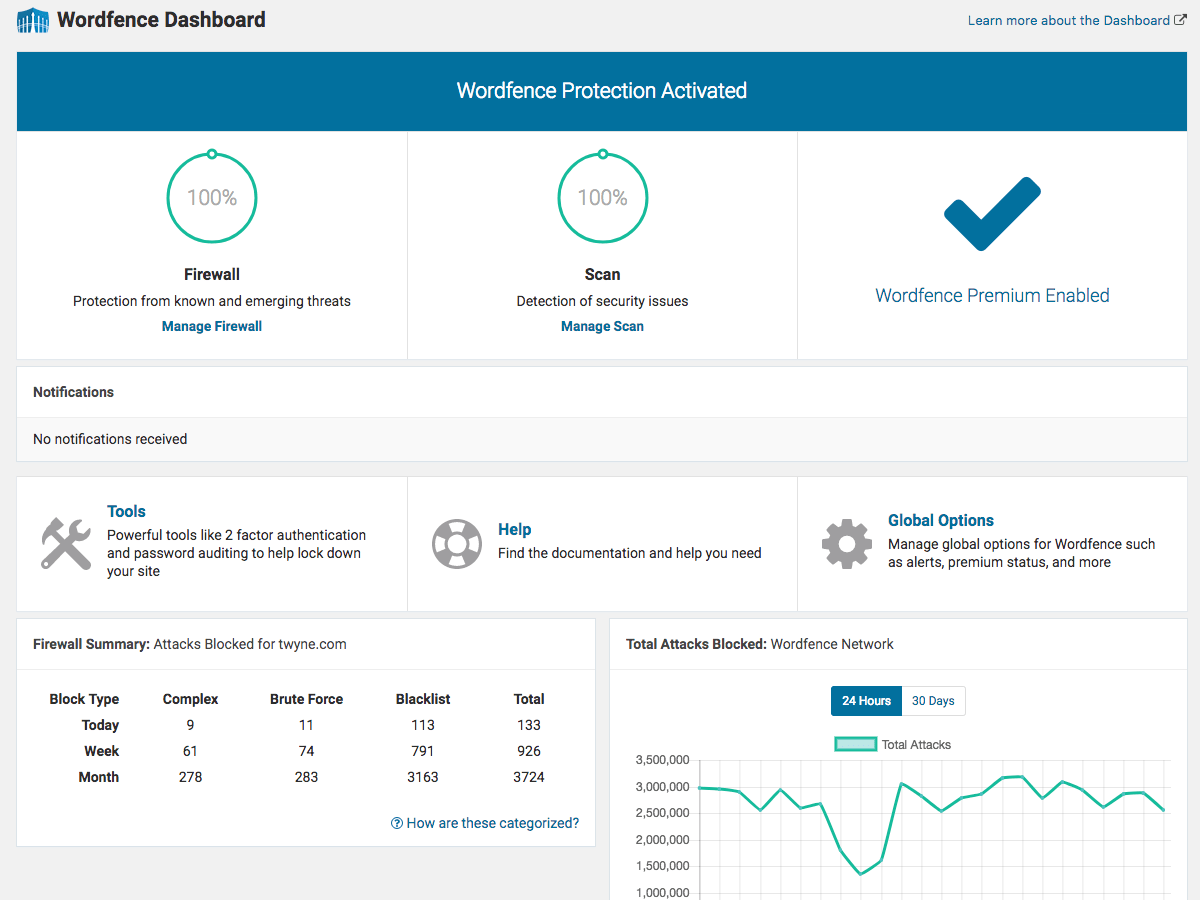
Installation
1. Install Wordfence automatically or by uploading the ZIP file.
2. Activate the Wordfence through the ‘Plugins’ menu in WordPress. Wordfence is now activated.
3. Go to the scan menu and start your first scan. Scheduled scanning will also be enabled.
4. Once your first scan has completed, a list of threats will appear. Go through them one by one to secure your site.
5. Visit the Wordfence options page to enter your email address so that you can receive email security alerts.
6. Optionally, change your security level or adjust the advanced options to set individual scanning and protection options for your site
.7. Click the “Live Traffic” menu option to watch your site activity in real-time. Situational awareness is an important part of website security.
2.Yoast SEO plugin

WordPress is one of the best content management systems when it comes to SEO. But even though it gets a lot right “out of the box”, there’s much more that you can do to improve your performance.
WordPress is a standout amongst other substance the board frameworks with regards to SEO. However, despite the fact that it gets a great deal ideal "out of the container", there's substantially more that you can do to improve your performance.
It is the favorite tool of millions of users, ranging from the bakery around the corner to some of the most popular sites on the planet. With Yoast SEO, you get a solid toolset that helps you aim for that number one spot in the search results. Yoast: SEO for everyone.

Downloading and installing Yoast SEO
1. If you don’t already have the Yoast SEO plugin installed on your site, let’s take care of that. If Yoast SEO is already installed and set up and you just want to learn more about how to use it, feel free to scroll on down to the "Using Yoast SEO" section.
2. From your site’s admin dashboard, look along the left-hand side of the screen for the “Plugins” option. When you hover over it, you’ll see the “Add New” option.
3. Click on “Add New” and you’ll be brought to a page with a selection of featured, popular, recommended, and favorite plugins. If you don’t see Yoast SEO listed under any of these sections, there’s a search box you can use to find it.
3.Contact Form7 Plugin
Contact Form 7 can deal with different contact structures, in addition to you can tweak the structure and the mail substance adaptably with straightforward markup. The structure underpins Ajax-fueled submitting, CAPTCHA, Akismet spam separating, etc.
WordPress Contact form 7 is one of the most popular plugins for creating lead generating forms. It is easy to integrate and equally easy to deploy. Contact Form 7 is even used with themes that have integrated contact forms because those forms do not offer customization and high-level options.
Having a contact page on your website is simply too important to be ignored, and a contact page is incomplete without a contact form.
Features of Contact Form 7
1. Simple implementation and integration process
2. Help is just a few clicks away

Setup Contact Form 7 in WordPress
Install the Contact Form 7 plugin.
Activate the plugin.
On the left navigation bar, click Contact.
Click Add New button if you are creating a new form.
Click the Mail tab.
Enter a Title for your form.
Update the To field to the email address where you want the form to send.
Just after installing the Contact Form 7 plugin, you’ll see a default form named “Contact form 1”, and a code like this: [#contact-form-7 id="1234" title="Contact form 1"]
Copy this code. Then, open the edit menu of the page (‘Pages’ > ‘Edit’) into which you wish to place the contact form. A popular practice is creating a page named “Contact” for the contact form page. Paste the code you copied into the contents of the page. Now your contact form setup is complete. Visitors to your site can now find the form and start submitting messages to you. Next, let’s see how you can customize your form and mail content.
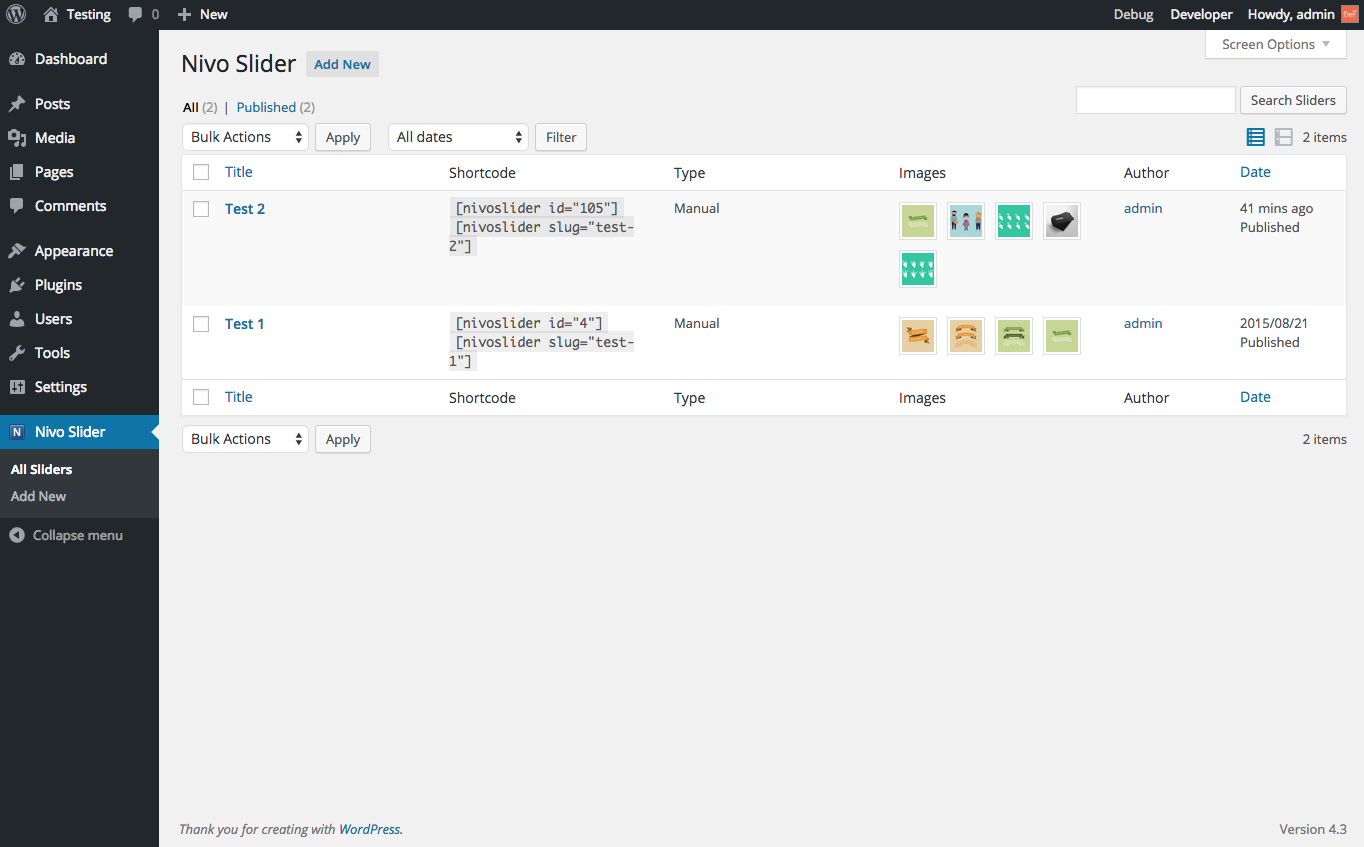
4.Nivo Slider Plugin

This is a standalone version of Nivo Slider that you can integrate with any web project you like. Built with jQuery, it delivers all the features of Nivo in a developer-friendly package.
The Nivo Slider is the worlds most popular jquery image slider plugin, downloaded over 3,000,000 times since it’s inception.
This is the “Lite” version of the official Nivo Slider WordPress plugin
which comes with email support and more features.
Easy to Use in WORDPRESS
Nivo Slider works ideal out the case with no arrangement required. You can begin adding sliders to your blog entries and pages directly after establishment. No coding aptitudes required.
Custom Slider Themes
Make your sliders look up-to-date by utilizing one of the accessible instant topics. From insignificant to conspicuous – Nivo has everything! Utilizing these subjects is push-catch simple.
Works with All Sites
Nivo coordinates with all WordPress topics and sites. There's additionally programmed picture editing to make your sliders look incredible on all gadgets and screens.
Installation
1. Log in to your WordPress admin backend.
2. Go to the Plugins > Add New page.
3. Click on the Upload tab.
4. On this page click the Choose File button choose the Nivo Slider WordPress Plugin zip file that you previously downloaded.
5. Install and activate the plugin.
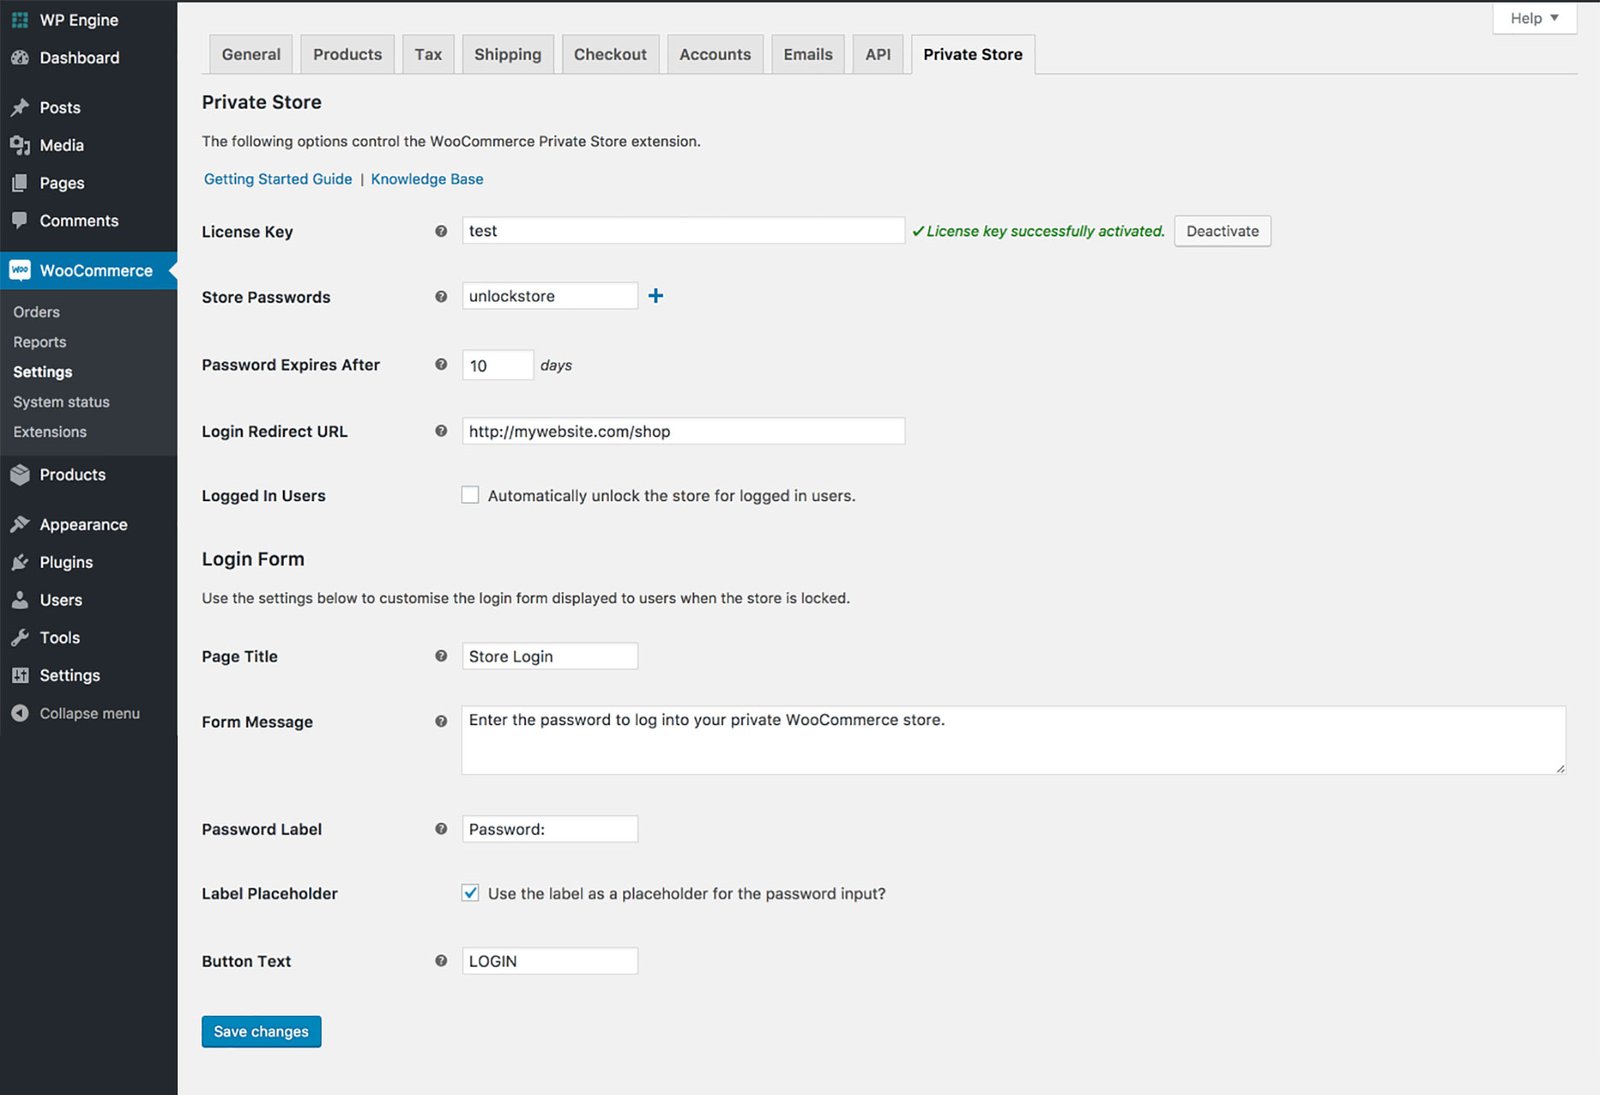
5.WooCommerce Plugin
WooCommerce is one of the best WordPress plugins if you want to add anything to sell on your website. Basically, it can be used quite effectively if you want to create an online store. It has a lot of features to help you grow your website with the help of an online store. If you own a website, it is quite certain that you will need to sell something on your website sooner or later..
WooCommerce is an adaptable, open-source eCommerce arrangement based on WordPress. Regardless of whether you're propelling a business, taking a current physical store on the web, or structuring locales for customers you can begin rapidly and assemble precisely the store you need.
WooCommerce is based on WordPress, the product that runs 26% of the web. Routinely inspected by Sucuri, an industry chief in security, you're in great hands.
From physical items and advanced downloads to memberships, content and even arrangements, you can sell anything with WooCommerce.
Working on top of the world’s most popular content management system, WooCommerce seamlessly integrates commerce with content. Everything you need is in one place.
WooCommerce is kept lean so you can add just the options you want. It’s also made to work alongside your favorite WordPress plugins, so you can keep the features you already love.
WooCommerce is entirely open source, which means you can modify and customize anything and everything. Because you have complete control, you can add unlimited products and users, and take unlimited orders.
WooCommerce runs on WordPress, recognized as one of the best platforms for SEO practices.
Installation
1. Log into your WordPress site.
2. Go to: Plugins > Add New.
3. Search for 'WooCommerce'.
4. Select Install Now when you see it's by Automattic.
5. Select Activate Now and you're ready for the WooCommerce Wizard!
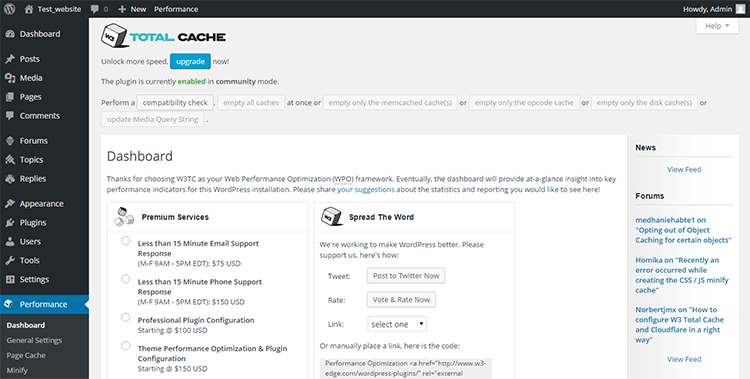
6.W3 Total Cache plugin

W3 Total Cache improves the SEO and user experience of your site by increasing website performance, reducing load times via features like content delivery network (CDN) integration and the latest best practices.
Site speed is something that we take very seriously. In order to make sure that our site scales and sustain huge loads of traffic without crashing, we utilize the W3 Total Cache plugin. It also helps us integrate with MaxCDN. W3 Total Cache plugin is used on sites like Mashable, Matt Cutt’s blog, CSS-Tricks, and WPBeginner as well.
The only web host agnostic Web Performance Optimization (WPO) framework for WordPress trusted by millions of publishers, web developers, and web hosts worldwide for more than a decade.
Enhancements in web search tool result page rankings, particularly for portable cordial sites and destinations that utilization SSL
At any rate 10x improvement in by and large website execution (Grade An in WebPagetest or critical Google Page Speed upgrades) when completely arranged
Improved transformation rates and "site execution" which influence your site's position on Google.com
"Moment" rehash online visits: program storing
Enhanced dynamic render: pages begin rendering rapidly and can be cooperated with all the more rapidly
Diminished page burden time: expanded guest time nearby; guests see more pages
Improved web server execution; support high traffic periods
Up to 80% data transfer capacity investment funds by means of minify and HTTP pressure of HTML, CSS, JavaScript and feeds
Installation
1. Login to your WordPress Dashboard.
2. Go to Plugins -> Add New.
3. Type W3 Total Cache in the search box and enter.
4. Click Install Now button and follow by activate plugin link.
7.Google Analytics plugin

Google Analytics module from ShareThis is the most ideal approach to add GA following code to your site without altering any documents. Simply sign in with Google directly from your WP administrator dashboard and pick which site you need to interface. At that point you can impair GA following of explicit clients, with the goal that when you are perusing your own site it won't influence your examination.
The best way to know your audience is through your traffic stats, and this is what Google Analytics provides for FREE.
One more thing – unlike other plugins, Google Analytics for WordPress has no monthly fees, and no paid upgrades. All the features are totally free.
Simple setup – Adds most recent adaptation of Google Analytics javascript to each page
Record connecting – no compelling reason to reorder any code or know your GA ID, simply sign in with Google, select the required site and it will naturally incorporate the fitting code
Guest patterns – Shows an outline dashboard with site hits, clients, pages per session and skip rate for as far back as 7 days when contrasted with the past 7 days
Traffic sources – Shows top 5 traffic sources so you know where your guests are coming from
Inclining Content – Shows a background marked by substance that is performing superior to average, so at some random time you realize what substance resounds with your group of spectators the most
Alarms – Sign up for cautions by means of email or Slack when your substance is taking off
Mobile – Fully upgraded for portable, so you can see your dashboards on any gadget
More updates coming – Continually refreshed and upheld by a group of top WordPress designers

Installation
1. Install Google Analytics either via WordPress.org plugin repository or directly by uploading the files to your server
2. Activate the plugin through the Plugins menu in your WordPress dashboard
3. Navigate to Google Analytics in the WordPress sidebar
4. Authenticate via Google, copy and paste the access code and choose your property from the dropdown. You can also add the web property ID from Google Analytics manually but dashboards won’t show up in this case.
5.When any of your content takes off you will see the URLs inside the Trending Content section
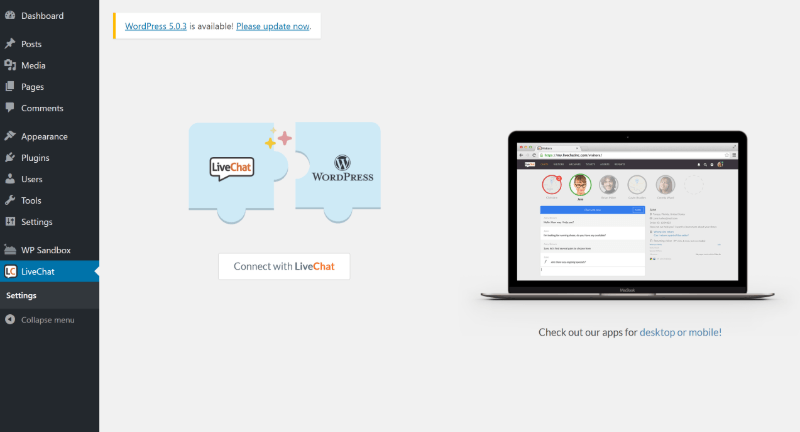
8.LiveChat plugin:

LiveChat–WP live talk module for WordPress is a WordPress visit module you can use to rapidly and effectively add live visit backing to your WordPress site. It takes into account moment correspondence with on location guests and clients and empowers brief goals to their inquiries or concerns.
With a completely utilitarian WordPress visit module, not just you can expand your deals – as it's the speediest method to expel purchaser complaints – however it likewise enables you to construct more grounded client connections.
LiveChat live talk application accompanies a far reaching set of highlights, including proactive visit solicitations – so talk administrators can naturally send customized messages to seem dependent on indicated conditions, for example, the quantity of visited pages or time spent on the site.
Also, it makes client administration increasingly productive by giving you a chance to hold numerous live talk sessions simultaneously, send canned reactions to often posed inquiries, include visit labels, survey visit transcripts and send documents to clients through the live talk window.
Installation
1. To install the “WP Live Chat ” plugin on your WordPress site.
2. Login to your WordPress administration panel and go to “Plugins” > “Add New”.
3. Search for “WP Live Chat Support” and click on “Install Now”.
4. Click on “Activate”.
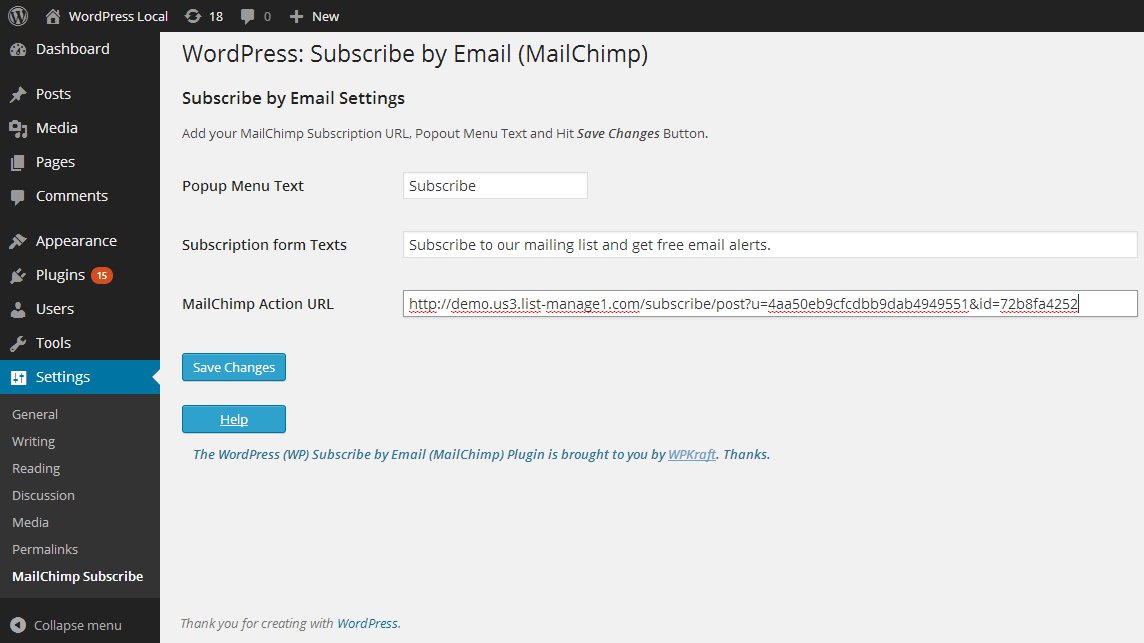
9. MailChimp Plugin

MailChimp is one of the most popular email marketing services to manage subscribers, send emails and track results in the bulk. It is no doubt a great marketing tool for the webmasters and business owners. To integrate MailChimp for a WordPress site is really easy with the plugin MailChimp for WordPress. It is a free plugin which allows you to add beautiful subscription forms in your WP blog. If you want to use the plugin for commercial purpose, you can try the premium version.
The plugin lets you create beautiful opt-in forms to add more subscribers to your email list. Besides, you can easily integrate the plugin with any other form on your sites like contact form, comment or checkout form. It supports all the major form plugins like Contact Form 7, WooCommerce, etc.
Installation
1. In your WordPress admin panel, go to Plugins > New Plugin, search for Mailchimp for WordPress and click “Install now“
2. Alternatively, download the plugin and upload the contents of mailchimp-for-wp.zip to your plugins directory, which usually is /wp-content/plugins/.
3. Activate the plugin.
4.Set your API key in the plugin settings.
10. Page Builder Plugin

Page Builder is a plugin that allows your content editors to get involved with controlling the page layout, in an intuitive, WordPress-like environment. It works with all themes and plugins, making it simple to generate flexible responsive layouts without the need for any coding knowledge at all. This is ideal for websites that will be managed by a less-technical user, who wants more flexibility than a pre-set list of page templates.
Page Builder is the most popular page creation plugin for WordPress. It makes it simple to make responsive section based content, Using the gadgets you know and love. Your substance will precisely adjust to every single cell phone, guaranteeing your site is versatile prepared.
Page Builder gives you complete opportunity to pick any WordPress theme you like. It is anything but a pledge to a solitary theme or theme developer. The advantage is that you’re free to change themes as often as you like. Your substance will consistently join you.

Installation
1.Login to your WordPress admin Dashboard.
2.Click on the plugin button to install
3.Add New plugin page.
4.Search For The Plugin
5.Install And Activate


